I started my presentation this month by referring back to the techniques covered by this topic a year ago. Yarn Club members who were at the November 2016 meeting may recall some great techniques tucked in at the end of the meeting, shared by Alexis. As mentioned in September, with our change in meeting format, we're now getting more time to really delve into each meeting topic. The finishing techniques shared last year included pre-planning your edges, seaming, and weaving in ends, so we touched on each of those again, and then took it a few steps further.
Before getting into any knitty gritty details (ha!) we took a moment to appreciate WHY finishing your pieces with care is so important. For many knitters, the knitting is the fun part, and picking up a darning needle brings all the fun to a halt, and your sweater pieces sit in a basket unseamed and unfinished. Don't let this be the case! Give your knits the respect they deserve with thoughtful finishing.
In the pre-planning discussion, I focused on choosing the correct selvage edge for your piece. The slipped stitch selvage that many knitters swear by for their pieces is not always the most appropriate choice. In general, follow these simple guidelines:
- if it’s going to be a FINISHED edge, use garter or slipped stitch edging
- if seed/moss/textured stitch, use this stitch or slipped stitch
- if edge will be SEAMED on stockinette, use stockinette selvage
There is a truly wonderful Craftsy class by Sally Melville that every knitter should watch, called Essential Techniques Every Knitter Should Know. That seems like a bold title, but oh man, they aren't kidding. Go and watch this. Take notes. Use the resources that come with the class. Incredibly useful and practical tips. You won't look at your knitting the same way again.
We discussed weaving in your ends, including some handy techniques to avoid picking up the darning needle, if you're so inclined.
When you're darning in your ends, take care to do it securely. This picture nicely summarized the DOs and DON'Ts:

Photo via Interweave Knits
But there are some other great techniques I learned while researching for this talk. You can knit in the tails, weave in the ends as you go, or splice them.
Knitting in the Tails:
- knit old yarn together with the new yarn for 5 or 6 stitches
- treat double stitches as one stitch on the next row
- no bulkier than weaving in the ends on the WS
- stitches cannot sit beside each other, one will move to the back
- will NOT work with fine, lace work - open work will show the worked in tails
Weaving in the Ends as you Go (also known as Knit-Knit-Unknit, or locking in long floats in colourwork):
- introduce new yarn by lightly draping new working yarn over the needle and knitting with the old yarn
- when knitting the next stitch with the new yarn, wrap the old yarn around the needle, then wrap the new yarn, and unwrap the old yarn as you knit the stitch
- lock the old yarn in place on the WS of your work for 5 or 6 stitches
This is best illustrated with a video to see it in action.
Splicing
- no “wrong” side, can be used on reversible items
- splicing guaranteed with wool, acrylics or superwash wools may not work
- break the wool, don’t cut it, as it leaves a tapered end
- pull apart the plies and taper them, or untwist the singles
- layer the two ends on top of each other, add a bit of moisture, and rub them between your hands to felt them a bit
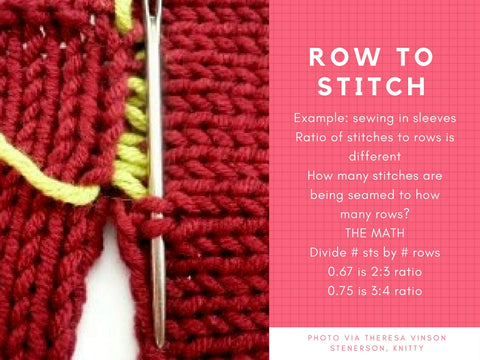
Seaming was the next chunk of our discussion, where I spent most of the talk on the different situations for seaming, and less time discussing the technique itself. You can seam using whipstitch, backstitch, or mattress stitch, my preferred method is mattress stitch. You can find loads of tutorials on mattress stitch, here's a great one with clear and easy to follow pictures from Purl Soho - https://www.purlsoho.com/create/mattress-stitch/
Your three main seaming situations are row to row, stitch to stitch, and stitch to row.


Ok, does this apply to picking up stitches too? You betcha!

Alright, what about the weird situations, like when you're picking up for ribbing around the neck of a sweater? You bet it does!

After a refreshing break to clear our heads from all the new knowledge, we came back to round out the evening with a look at adding zippers to our knitting, and steeking.
For a detailed and very helpful tutorial on everything zippers, I highly recommend Kate Atherley's article on Mason-Dixon Knitting. Kate leads you through choosing the right zipper, correct placement, and helpful tips from the experts along with "learn from my mistakes" tips. A great article and a great resource. I tried out the techniques myself with a swatch that I passed around at the meeting, and I can tell you I learned everything I know about adding zippers to knitting from this article.
Steeking certainly got everyone's attention to close out our meeting. I tried out some different techniques on teeny tiny swatches knit in the round, I tested out hand sewing and crocheting to reinforce the steek before cutting. My personal favourite technique is the crochet reinforcement, but I shared that my very first (and only) steeking project was reinforced with two rows of machine sewn stitches on either side of the steek. I was positively terrified that it would come undone!
I won't reinvent the wheel to share the knowledge I learned about steeking, so check out the resources below for comprehensive tutorials and tips to try on your next project:
Crochet reinforcing by Tin Can Knits
A steek overview by Interweave Knits
The steek sandwich by Kate Davies
Happy knitting!