This month at Yarn Club we talked about our favourite finishing techniques, and I demonstrated a few with my MacGyver'd projection camera so people could see what my hands were doing projected on the wall.
How you weave in your ends and seam up a project can make or break all your hard work. It's rarely a yarnista's favourite part of the project, but it's worth knowing how to do it well: think of seams as the frame for your work. If they are sloppy or misshapen they will detract from your beautiful stitches.
I've gathered some resources here from around the web to help you perfect your finishing touches.
Planning for the final touches
There are a few techniques that you might incorporate into a project from the very beginning to make the finishing easier. Adding a selvage stitch or two to each side of a sweater's pieces, and working these stitches up the length of the sweater in garter stitch, for example, will make seaming easier for some projects (like a lace sweater...).
You might also like to add a turned hem. Becky Herrick has a great post about turned hems on her blog Ramblings:

The other thing I want to mention in terms of planning for finishing is to BLOCK YOUR PIECES FIRST. Seriously. Before you weave in your ends even. If you're not sure about blocking, that's what we're talking about at the next meeting. Then, when you're done seaming/weaving/etc. BLOCK AGAIN.
Okay, now that I've got you all on side...
Weaving in ends
I didn't know there was a "right" way to weave in ends, until I started the research for November's meeting. But apparently there is. I certainly knew there was a wrong way to weave in ends, on account of that sweater I made that fell apart that time... and I knew that I had worked on my weaving in technique until I landed on one that a) didn't come apart, and b) was invisible (even to me). If you're where I am in terms of your weaving in, then maybe you don't need to know the "right" way. If however you're still at the "my knitting develops gaping holes over time" stage, then maybe the "right" way is a good jumping off spot for you:
Seaming
As I understand it, the most popular seam for knitwear is the mattress stitch, and Theresa from Knitty.com has a great pictorial tutorial:

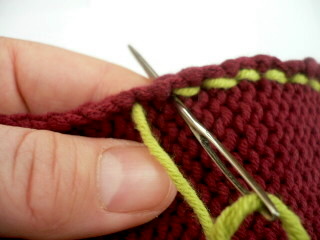
That said, my favourite seam is the back stitch. I default to this one for a few reasons, not least of which is that I was already familiar with it from embroidery before I ever started knitting in earnest. I stick with it because it's strong and it's not going anywhere - unlike a mattress stitch or running stitch, there's no danger of it ruching, and it's doubled up so there's less chance of your seams pulling apart. Here's another look from Knitty.com:
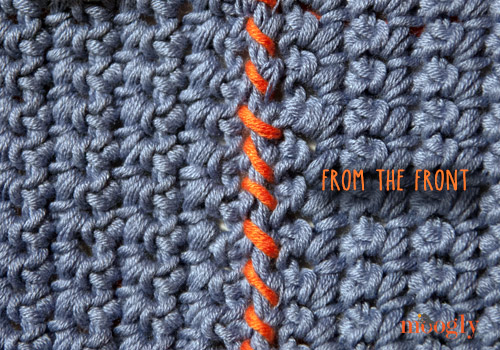
Another option is the whip stitch, although its application needs to be carefully chosen - it can have a pretty decorative effect, but it needs to look intentional because it will be visible and if not done with deliberation can look messy. Here's a tutorial from Tamara at Moogly with both photos and video:
Have a favourite seam or weaving-in technique? Please feel free to share!